You can make clean, restaurant-style uramaki (inside-out) rolls without a bamboo mat by using plastic wrap, a clean towel, or cling film, plus a steady, gentle roll. With properly cooled sticky rice, restrained fillings, and a simple towel-or-plastic-wrap method, you’ll get tight inside-out rolls that hold together and slice neatly.

This post walks you through each step so you can go from spreading the rice to sealing the final roll with confidence. You’ll see how to control rice stickiness, layer nori and fillings, form the roll without a mat, and cut tidy pieces for a plate that looks as good as it tastes.
Key Takeaways
- Pick up a reliable no-mat rolling method that keeps the rice on the outside.
- Use simple tools and controlled fillings for tight, sliceable uramaki.
- Small handling tweaks fix issues like loose rolls or rice sticking.
Understanding Uramaki and Inside-Out Sushi

Uramaki puts rice on the outside and seaweed on the inside. Here’s what uramaki is, how it stands apart from regular maki, and why rolls like the California roll caught on.
What Is Uramaki
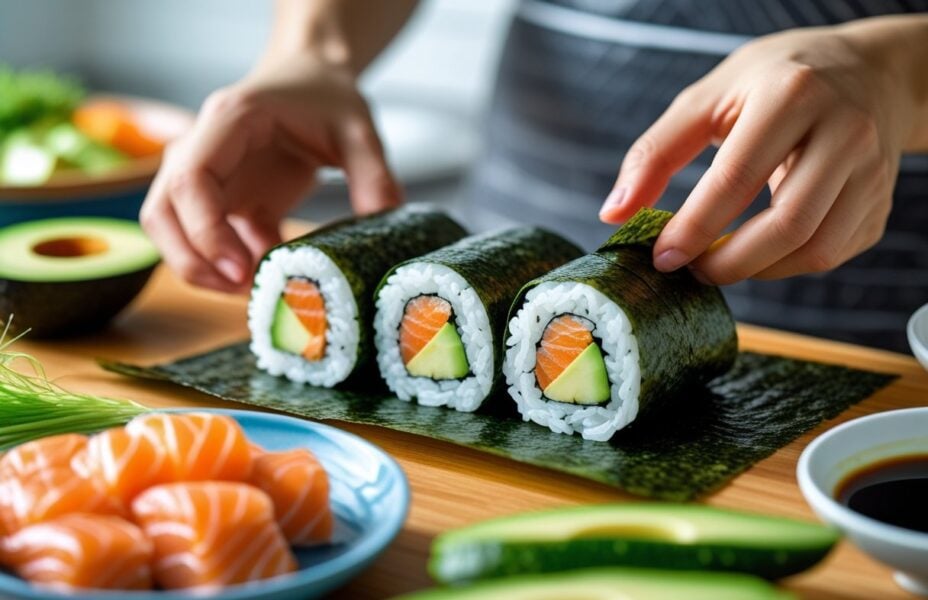
Uramaki, or inside-out roll, flips the usual sushi layers: nori (seaweed) wraps the filling and sushi rice covers the outside. You’ll usually spread a thin, even layer of seasoned rice over the nori, flip it, add fillings like crab, cucumber, and avocado, then roll so the rice stays outside.
Key points to watch:
- Rice thickness: aim for about 4–6 mm for stability.
- Rice moisture: use tacky, seasoned sushi rice so toppings stick.
- Clean edges: leave a small strip of nori without rice to seal the roll better.
Uramaki makes the roll easier to eat with hands or chopsticks. The rice on the outside gives a softer bite, too.
How Uramaki Differs from Maki Sushi
Maki sushi keeps the rice inside and nori on the outside. You wrap the filling in nori, then roll the rice around it for hosomaki or futomaki.
With maki, the nori acts as a structural shell, so it’s a bit easier for beginners since the sticky rice stays contained. Uramaki needs more careful handling—rice on the outside means you need steady pressure and can’t overfill. Toppings like sesame seeds or roe stick to the rice and change texture and stability. Maki leans on nori’s strength, while uramaki depends on rice handling.
Popular Inside-Out Rolls Like California Roll
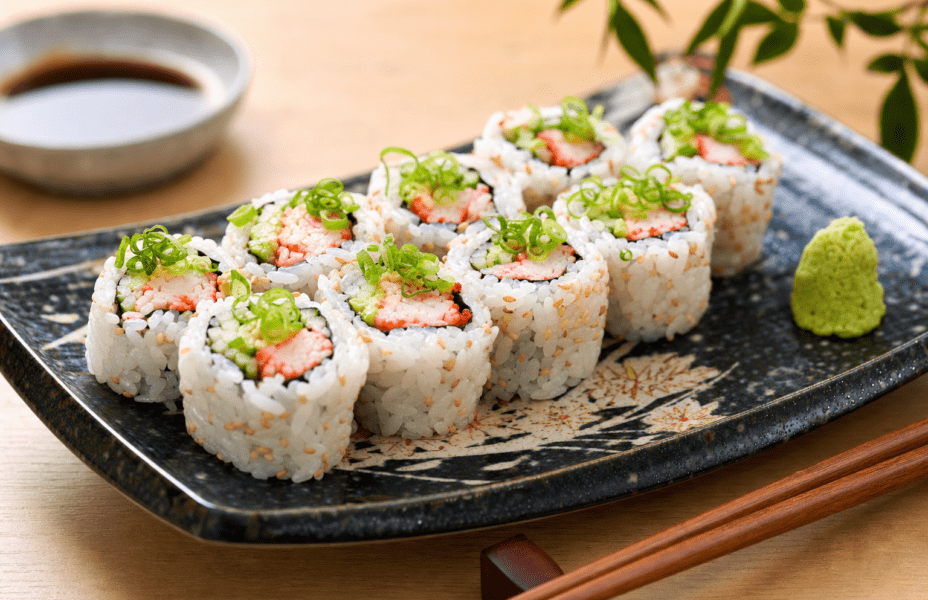
The California roll is the classic uramaki. It usually has imitation crab (sometimes real crab), avocado, and cucumber. The nori sits between the filling and rice, hiding the green strip inside and making the roll friendlier for folks unsure about seaweed.
Common variations and toppings:
- Sesame seeds or masago on the rice exterior.
- Avocado slices on top for a Dragon-style twist.
- Tempura crumbs inside for crunch.
For step-by-step visuals and guidance, check out this practical guide on rolling uramaki: How To Roll Inside-Out Sushi Rolls (Uramaki).
Essential Ingredients for Homemade Uramaki

You want rice that sticks but stays tender, nori sheets that hold their shape, and fillings that balance texture and flavor. Measure, rinse, and season rice carefully. Choose full-size nori, and pick fillings that slice thin and roll tight.
Choosing the Best Short-Grain Sushi Rice
Pick Japanese-style short-grain rice labeled “sushi” or “calrose” for the right chew and stickiness. Rinse the rice under cold water until the water runs clear—this washes off excess starch and keeps the rice from turning gummy.
Use a 1:1.1 to 1:1.25 rice-to-water ratio for stovetop pots, or follow your rice cooker’s sushi setting. Season the cooked rice with a warm mix of rice vinegar, caster sugar, and fine sea salt. Fold the seasoning in with a cutting motion to cool the rice quickly and keep the grains separate. Always work with room-temperature rice when forming uramaki so the nori and fillings don’t turn soggy.
Selecting and Using Nori Sheets
Look for dark, shiny nori labeled for sushi—thicker sheets tear less as you roll. Store unopened packs in a cool, dry spot, and put opened sheets in an airtight container with a desiccant or a pinch of rice to keep them crisp.
For inside-out rolls, you’ll put rice outside the nori, so use slightly damp hands to handle the nori and avoid cracks. Toasting whole nori briefly over low heat (just a few seconds per side) brings out flavor and makes it more flexible. Cut full sheets in half for shorter, thicker rolls, or use the whole sheet for longer ones.
Typical Fillings and Toppings
Go for one protein, one creamy or crunchy thing, and one fresh veggie per roll. Popular proteins: raw salmon, cooked prawn, or imitation crab. If you’re using raw fish, always pick sashimi-grade. Avocado, cucumber, and pickled daikon add nice contrast.
Top your rolls with sesame seeds, tobiko, or thin fish slices. These add flavor and help hide little imperfections. Keep fillings thin and packed in a single line—makes rolling without a mat way easier. Prep sauces separately and drizzle after slicing, not inside, so the rolls don’t get soggy.
Tools and Alternatives to a Bamboo Mat

You’ll need something flexible to shape the roll, a non-stick layer to stop sticking, and a clean, flat surface. Pick tools that let you apply even pressure and lift away cleanly so the uramaki keeps its rice on the outside.
Using Kitchen Towels and Plastic Wrap
Grab a thin kitchen towel and cover it with a double layer of cling film. Lay the towel flat, then put a sheet of plastic wrap big enough to wrap the roll fully.
The towel gives just enough resistance to shape the roll, while the plastic keeps rice from sticking. Place your nori, rice-side down, on the plastic, add fillings, then lift the towel edges to start a tight roll. Apply steady, even pressure with your fingers or thumbs. Once rolled, pull the plastic wrap taut and press again to firm the shape. Chill the wrapped roll in the fridge for about 5–10 minutes to set the rice before slicing.
Use food-grade plastic wrap—skip anything printed or scented. If the wrap sticks to your fingers or tears, swap it out for a new piece. For uramaki, flip the nori so rice is on the outside before wrapping.
Other Creative Rolling Alternatives
A silicone baking mat is a solid, washable substitute. Clean the mat, lay a sheet of plastic on top for extra non-stick, then roll like you would with a bamboo mat. The mat’s flexibility helps form a tight cylinder.
Or try parchment paper: fold it into a rectangle, cover with plastic wrap, and use it like the towel method. If you have a rolling pin or small bottle, use it to gently shape and press the roll after you’ve rolled the cylinder. Just roll gently—don’t crush the fillings or burst the rice.
Skip rigid tools like metal or glass—they don’t flex and can tear nori. Choose tools that clean up easily and won’t leave weird smells or flavors on the sushi.
Preparing Your Workspace
Clear a flat counter space, at least 30 cm wide. Keep a damp cloth, a bowl of water with a splash of rice vinegar, and a sharp, wet knife close by for cutting.
The wet knife keeps rice from sticking when you slice uramaki. Arrange your ingredients within arm’s reach: prepared sushi rice, nori, fillings, and condiments. Have a clean plate or tray lined with plastic to rest finished rolls. Wash your hands and wipe surfaces to keep things clean and stop rice from sticking everywhere.
Work quickly, but don’t rush. Cold hands help keep rice from sticking—if your hands get sticky, dip them in the vinegar water.
Step-by-Step Method: Making Uramaki Without a Bamboo Mat

You’ll make sticky sushi rice, press it thin on nori, flip the sheet so rice faces out, add fillings, then roll tightly using a towel and plastic wrap. Focus on even rice thickness, a clean flip, centered fillings, and a firm, even roll.
Preparing and Seasoning Sushi Rice
Rinse 250 g short-grain sushi rice under cold water until the water runs clear. Drain for 30 minutes, then cook with 300 ml water in a heavy pot or rice cooker.
Let the cooked rice rest covered for 10 minutes. Mix 45 ml rice vinegar, 20 g sugar, and 5 g salt until dissolved and cooled. Transfer rice to a wooden or plastic bowl and fold the vinegar mix in with a cutting motion—don’t mash the grains. Fan the rice while folding to cool it quickly and keep it glossy.
Keep a small bowl of water with a splash of rice vinegar by your work area. Wet your fingers every time you touch rice to stop sticking. Don’t pile the rice on thick—aim for a thin, even layer on the nori later.
Layering Rice and Flipping Nori
Lay out a clean lint-free towel and cover it with a sheet of plastic wrap roughly the size of the nori. Place one nori sheet, shiny side down, on the plastic.
Spread a thin, even layer of sushi rice over the nori using wet hands. Leave a 1 cm dry border along the top edge to help seal. Pat the rice gently—don’t press hard, or the roll turns dense.
Carefully flip the nori so the rice now faces the plastic wrap and the shiny seaweed faces up. Use the towel under the plastic to help support the nori during the flip. Smooth the rice from underneath through the plastic so it stays intact on the outside for uramaki.
Adding Fillings and Rolling Technique
Turn the flipped nori so the rice side faces down on the towel and plastic again. Place your fillings—say, sliced avocado, cucumber batons, and cooked crab—in a 2–3 cm line across the center of the seaweed. Keep fillings tight and lined up lengthwise.
Lift the towel edge nearest you and start to fold the seaweed over the fillings, cupping the filling gently as you roll. Use the towel to guide and apply gentle, even pressure. Roll slowly to keep the filling centered.
When you reach the seam, moisten the exposed nori border with a little water to help it stick. Keep rolling until you have a tube. If rice leaks, use the towel to press and reshape before sealing.
Sealing and Shaping the Roll
Wrap the finished roll tightly in the plastic-lined towel. Press firmly along the length to shape it into an even cylinder.
Hold for 30–60 seconds to help it set. Unwrap and coat the outside with sesame seeds if you like, pressing them onto the rice.
Grab a sharp, wet knife and cut the uramaki into 8 pieces. Wipe and wet the blade between cuts to keep slices clean.
If the rolls feel too soft, chill them for 10–15 minutes. Serve with soy sauce, pickled ginger, and wasabi.
Store leftovers covered in the fridge for up to 24 hours. That helps keep the rice from drying out.
Slicing and Presenting Uramaki Rolls

Chill your roll for a bit and make sure your knife is sharp. Wet the blade and cut with one confident stroke for neat, even pieces.
Cutting Rolls Cleanly Without Squashing
Use a sharp long knife—chef’s or sashimi—and keep it damp between cuts. Wipe the blade after each slice so rice and fillings don’t stick or tear the roll.
Place the roll on a flat board and steady it with your free hand. Slice in one smooth motion and avoid sawing.
If you’ve got thicker fillings, use slightly shorter, firmer strokes. That helps prevent squashing.
Cut each roll into 6–8 pieces. Try to keep the widths even for a nice look and easier eating.
If rice sticks to the knife, dip it in water with a splash of rice vinegar. That keeps the surface glossy and clean.
Plating and Garnishing for Visual Appeal
Lay the pieces in a straight line or fan them out on a plain plate. A dark plate really makes pale rice pop, while a light plate helps colorful fish or veggies stand out.
Add small accents: a zigzag of mayo-based sauce, a dot of soy reduction, or a sprinkle of toasted sesame seeds. Place pickled ginger and a little wasabi on the side, not touching the sushi.
For that restaurant vibe, top a few pieces with microgreens or thin avocado slices. Keep garnishes simple and balanced so they don’t overpower your homemade uramaki.
For inside-out rolls, roll the outer rice in sesame or tobiko before slicing. It adds texture and keeps the rice from getting squished when you cut.
Other Sushi Styles Without Bamboo Mat
You can make neat hand rolls, compact sushi balls, and classic maki with just a sheet of nori, cling film, or a clean towel. Focus on tight packing, even rice temperature, and sharp, damp knife cuts.
Making Hand Rolls (Temaki) and Sushi Balls
Hand rolls (temaki) use one nori sheet folded into a cone. Put the shiny side out, spread a thin layer of sushi rice on one corner, and leave the top edge dry.
Stick to low-moisture fillings like cucumber, avocado, and pre-sliced fish so your nori doesn’t get soggy. Fold the nori over the filling and roll it into a cone with your fingers.
Hold it briefly to let the seam seal. No mat needed for this.
For sushi balls, grab some cling film or damp plastic wrap. Place a tablespoon of rice in the film, press a little filling into the center, then pull the film tight and squeeze it into a ball.
Chill the sushi balls for a few minutes so they hold their shape. Serve with a dab of wasabi or soy on the side.
Tips for Maki Sushi Without a Mat
Lay a sheet of cling film over a clean towel or parchment if you don’t have a mat. Put nori shiny-side down, spread rice thinly and evenly, and pat it with a wet spoon to stop sticking.
Place fillings in a single line about 2 cm from the edge closest to you. Start rolling by lifting that edge and tucking it over the filling, guiding with your thumbs and compressing gently with your fingers.
After the first tuck, roll with steady, even pressure to make a tight cylinder. For inside-out rolls, flip the nori after spreading rice and use the cling film to help invert it.
Slice rolls with a sharp knife dipped in water between cuts. Keep fillings dry, rice slightly warm, and work on a flat, clean surface for neat maki without a bamboo mat.
Troubleshooting and Additional Tips
Keep rice texture right and press rolls evenly. A clean, sharp knife makes all the difference for neat slices.
Small tweaks in pressure, filling amount, and moisture can fix most issues fast.
Preventing Roll Breakage and Loose Fillings
Make sure your sushi rice is tacky and slightly cooled, not wet. Wet rice slips and tears nori when you roll.
Spread a thin, even layer of rice and leave a 1–2 cm clear edge of nori at the top for sealing. Roll tightly but gently, starting with a firm tuck along the filling, then squeeze evenly as you go.
If you’re skipping the bamboo mat, wrap cling film over a clean towel or use plastic wrap directly. Both give support and help compress the roll without tearing the nori.
Trim big filling pieces—cut cucumber, avocado, and fish into long, thin strips so they sit flat. Overstuffing causes bulges that burst the roll when you cut it.
If the roll still feels loose, press it wrapped for 5 minutes before slicing. That lets the rice settle a bit.
Common Mistakes and How to Avoid Them
A dull knife or slicing without wiping the blade leads to ragged pieces and squashed rolls. Dip a sharp knife in hot water and wipe it clean between cuts for neat slices.
Placing rice on the shiny side of nori or spreading it too thick makes rolling a pain. Always put the shiny side down and use a damp rice paddle or spoon to smooth a thin, even coat.
Don’t forget to moisten the nori edge. Lightly brush the top 1–2 cm with water or a rice vinegar mix.
Check filling temperature: very cold fish makes rice firm and harder to compact, while warm fillings make rice sticky. Aim for room-temperature fillings if you can.
If rice sticks to your hands or work surface, keep a small bowl of water mixed with vinegar nearby. Wetting your fingers stops rice from clumping and makes spreading smoother.
Frequently Asked Questions
Here are some quick, practical answers about tools, shaping, rolling by hand, ingredient prep, and cutting techniques for uramaki when you don’t have a bamboo mat. Each one lists steps you can actually use.
What alternative tools can I use to roll uramaki sushi if I don’t have a bamboo mat?
Use a clean lint-free towel wrapped in plastic wrap to protect the nori and keep fibers out of the rice. A silicone baking mat or a sheet of parchment under plastic wrap also works well for grip and coverage.
If you need a firmer guide, roll the towel around a rolling pin or bottle as you shape the roll. Some people press rolls inside a shallow tray lined with cling film to help form an even cylinder.
How do I maintain the shape of an uramaki roll without using a bamboo mat?
Spread the rice thinly and evenly so the filling fits snugly. Keep fillings compact and centered; long, uniform strips help the roll stay cylindrical.
After you form the roll, wrap it tightly in plastic wrap and press gently along the length for 30–60 seconds. Chill the wrapped roll in the fridge for 10–20 minutes to set its shape before cutting.
Can I achieve a tight sushi roll for uramaki without traditional equipment?
Yes, you can. The trick is firm, even pressure while rolling and sealing the nori edge with a little water.
Use your palms to roll, then cup the roll and squeeze gently along its length. If you struggle with slippage, place the rice-side-out roll seam-down on the cling film and use the towel to compress it evenly.
Cooling the roll briefly also firms the rice and helps keep it tight.
What techniques are recommended for rolling uramaki sushi by hand?
Start by spreading rice on nori thinly, then flip it so rice faces out before adding fillings along the center. Use the plastic-wrapped towel to lift and roll the nori over the filling, tucking the edge in as you go.
Keep your fingers close to the filling to guide it and apply steady, even pressure. Finish by turning the roll seam-side down and using the towel to shape and compress the roll for a smooth surface.
How does the preparation of uramaki ingredients differ when not using a bamboo mat?
Cut fillings into uniform, thin strips about 2–3 cm wide so they sit neatly and don’t push the roll out of shape. Drain wet ingredients like pickles or marinated fish well to avoid soggy rice and slipping layers.
Keep rice cool enough to handle but still sticky. If it’s too warm, it’ll be too soft to shape well without a mat.
You can also trim nori edges slightly to make sealing easier when rolling by hand.
Is there a specific method to cut uramaki sushi rolls to prevent them from falling apart without a bamboo mat?
Wrap the roll in plastic and chill it for 10–20 minutes. This helps firm everything up before you start cutting.
Grab a really sharp, non-serrated knife. Wet the blade between each cut to keep rice from sticking or tearing.
Cut straight down with one smooth press, not a sawing motion. If a piece looks like it’s falling apart, gently press the cut face and maybe pop the roll back in the fridge for a bit before you finish slicing.